Now Reading: Using Moho Animation: A Guide
-
01
Using Moho Animation: A Guide
Animation has evolved dramatically over the past few decades, moving from painstaking hand-drawn frames to sophisticated digital workflows. One of the standout tools in modern animation is Moho Animation, formerly known as Anime Studio.
Moho provides animators, hobbyists, and professional studios with a robust platform for creating 2D animations with efficiency, precision, and creativity. This guide will take you through everything you need to know about Moho Animation, including its features, workflow, tips for beginners, and best practices for creating polished, professional animations.
What is Moho Animation?

Moho Animation is a 2D animation software designed for artists who want to bring characters and stories to life digitally. Unlike traditional frame-by-frame animation software, Moho combines vector-based rigging with bone systems, allowing characters to move fluidly without drawing every single frame manually. This makes it particularly powerful for animators who want to produce high-quality content more efficiently.
Moho is used by a variety of creators, from independent animators producing web series to professional studios creating content for television and online media. The software is appreciated for its blend of traditional animation techniques with modern tools, bridging the gap between hand-drawn artistry and digital efficiency.
Key Features of Moho Animation
1. Bone Rigging System
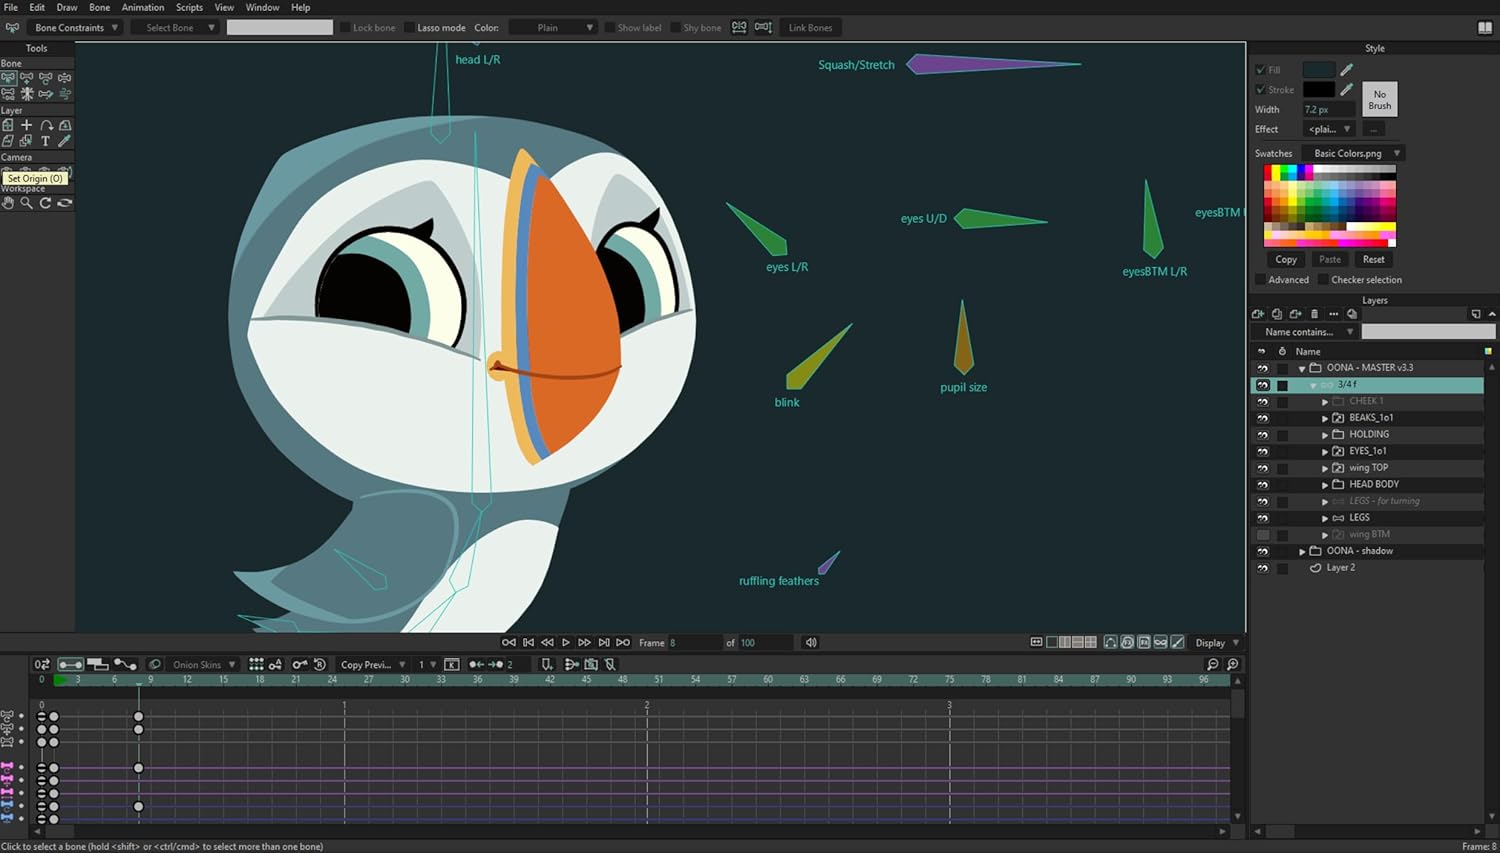
One of Moho’s most powerful features is its bone rigging system. This system allows animators to create a skeletal structure for characters, enabling natural movement without redrawing each frame. Bones can control limbs, facial features, and even complex mechanical objects, making the animation process faster and more flexible.
2. Vector-Based Tools
Moho relies heavily on vector graphics, which means artwork is scalable without losing quality. This is perfect for animators working with different resolutions, such as HD, 4K, or mobile formats. Vector tools also make it easier to tweak shapes and designs during the animation process.
3. Smart Bones
Smart Bones are advanced features in Moho that allow you to control complex deformations in characters, such as facial expressions or bending limbs. They help prevent distortion and ensure that animations remain smooth and professional-looking.
4. Layer Management and Timeline
Moho’s timeline and layer system allow precise control over animations. You can manipulate timing, ease in and out, and adjust frame sequences efficiently. Layers can include images, vector shapes, text, or imported artwork from other programs like Photoshop.
5. Physics and Particle Systems
Moho also includes physics simulations for creating natural movement of objects, hair, or clothing. Particle systems allow animators to add effects such as smoke, fire, rain, or magic effects to enhance the visual storytelling.
Getting Started with Moho Animation
Starting with Moho Animation may seem overwhelming at first, but breaking down the workflow into manageable steps makes it approachable even for beginners.
1. Installing and Setting Up
After purchasing or downloading Moho, installation is straightforward. Once installed, you’ll want to set up your workspace. Moho allows customization of panels, toolbars, and the timeline to suit your workflow. Beginners should start with default layouts and explore customization as they gain confidence.
2. Creating Your First Project
Begin by creating a new project and setting your canvas size. Canvas size depends on your output goals: 1920×1080 for HD video or smaller dimensions for web animations. You can import assets such as character illustrations, backgrounds, and props directly into Moho or create them within the program using vector tools.
3. Rigging Your Character
Import your character illustration and use the bone tool to create a skeletal structure. Attach limbs, torso, and head to bones using the Bind feature. This will allow you to move the character without distorting the shapes. For faces, consider using Smart Bones to enable expressions like smiles, frowns, and blinks.
4. Timeline Animation
With your rig in place, move to the timeline to animate. Set keyframes for the start and end positions of movements, then allow Moho to interpolate the motion in between. Use easing tools to create natural acceleration and deceleration for more lifelike motion.
5. Adding Backgrounds and Effects
Once the character animation is complete, add backgrounds, props, and visual effects. Moho supports multiple layers, so you can manage these elements without affecting your character rigs. Use particle systems for additional effects, such as snowfall or sparks.
Advanced Techniques in Moho Animation
While beginners may focus on basic rigging and movement, Moho Animation has powerful tools for advanced animators.
1. Lip Syncing
Moho allows for automatic or manual lip syncing. By importing audio and setting phoneme keyframes, you can animate characters’ mouths to match speech. This is essential for dialogue-driven animations.
2. Camera Movement
Moho includes a virtual camera, enabling zooms, pans, and complex motion shots. Animators can move both characters and camera simultaneously for dynamic scenes that feel cinematic.
3. Physics-Based Animation
Advanced animators can use Moho’s physics engine to simulate gravity, collisions, and elastic motions. This is useful for action sequences or naturalistic environmental interactions.
4. Morph Targets
Morph targets allow for smooth transitions between different shapes or expressions. This is particularly useful for facial animations, allowing subtle emotional nuances without redrawing frames.
Tips for Maximizing Efficiency in Moho Animation
1. Plan Before You Animate
Planning is the foundation of any successful animation project. Before opening Moho, take the time to storyboard your scenes, sketch key frames, and map out character movements. Knowing where your characters will be, how they will move, and what the camera angles will be helps prevent unnecessary revisions later.
Planning also allows you to anticipate challenges, such as complex interactions between characters or overlapping movements, and ensures that your workflow is smooth. By having a clear roadmap, you can focus on creativity instead of constantly troubleshooting issues mid-animation.
2. Use Templates and Libraries
Moho offers an extensive range of templates, pre-rigged characters, props, and effects that can save you countless hours. Leveraging these resources allows you to reuse assets across projects or within the same scene, reducing repetitive work.
For example, if you need multiple background elements like trees, furniture, or vehicles, pre-made templates can be customized instead of redrawn from scratch. Additionally, creating your own personal library of frequently used assets can accelerate future projects, making Moho a tool not only for animation but also for efficient content management.
3. Master Keyboard Shortcuts
Keyboard shortcuts are one of the simplest ways to boost productivity in Moho Animation. By learning shortcuts for frequently used tools, such as the bone tool, selection tool, shape editing, and timeline controls, you can minimize the need to navigate menus repeatedly.
This small change can save significant time over the course of a project, especially for complex animations with multiple characters and layers. Experienced animators often create custom shortcut setups tailored to their workflow, further streamlining the process and allowing for faster, more intuitive animation.
4. Keep Layers Organized
Layer organization is critical when working on multi-character scenes or complex sequences. Clearly labeling layers and grouping related elements, like separating foreground characters from backgrounds or props, helps prevent confusion and errors. Organized layers make it easier to apply adjustments, such as moving a character or editing a background, without affecting other parts of the animation.
Additionally, using color-coded layers or folders can visually differentiate elements, making the workspace more navigable and reducing the risk of accidentally altering key assets during editing.
5. Take Advantage of Tutorials and Community Resources
Moho has a vibrant user community and a wealth of tutorials ranging from beginner tips to advanced animation techniques. Engaging with these resources can accelerate your learning curve and provide solutions to problems you may encounter. Online forums, video tutorials, and official documentation are valuable for mastering features like Smart Bones, particle effects, lip-syncing, and rigging. Additionally, connecting with other Moho users can inspire new ideas, offer feedback on your projects, and keep you updated on software updates or new tools. Leveraging the community ensures you are not only learning efficiently but also staying creatively inspired.
Common Challenges and How to Overcome Them
Even with Moho’s user-friendly tools, animators may face challenges:
- Character Deformation: Poor bone placement can cause unnatural bending. Solution: Use Smart Bones and test movements before final animation.
- Complex Scenes: Managing multiple characters and layers can become overwhelming. Solution: Organize layers and use pre-compositions to simplify scenes.
- Timing and Flow: Motion can appear stiff if keyframes are not spaced properly. Solution: Use easing and motion arcs for natural animation.
- Lip Sync Accuracy: Manual adjustments may be needed for perfect syncing. Solution: Fine-tune phoneme keyframes and review audio carefully.
Why Moho Animation is Popular Among Gen Z and Professionals
1. Digital-Native Tools
Moho Animation offers an interface that feels intuitive for creators who are already familiar with digital drawing and vector-based tools. Unlike traditional 2D animation, which requires redrawing each frame by hand, Moho streamlines the process with bone rigging, Smart Bones, and vector tools.
This allows animators to achieve the fluidity and expressiveness of 2D animation while benefiting from a workflow that is faster and more flexible, qualities that are especially appealing to Gen Z creators growing up in a digital-first environment.
2. Affordability
Compared to high-end 3D animation software like Maya or Blender, which can be expensive and resource-intensive, Moho provides a professional-grade 2D animation platform at a fraction of the cost.
This accessibility empowers young animators, hobbyists, and small studios to experiment freely without financial constraints. Professionals also benefit, as Moho allows them to produce polished content efficiently without sacrificing quality, making it an attractive alternative for both personal and commercial projects.
3. Versatility
Moho supports a wide variety of project types, from short-form content like YouTube videos and TikTok animations to full-length web series, explainer videos, and commercials. Animators can easily switch between simple character movements and complex, multi-layered scenes.
This versatility allows creators to explore multiple styles and genres within the same software, making it a flexible solution for studios and independent artists alike.
4. Cross-Platform Output
Moho allows users to export animations in formats compatible with streaming platforms, social media, and professional pipelines. This is particularly important in the modern digital era, where content is consumed across multiple devices and platforms. By supporting high-quality exports, Moho ensures that animations retain their clarity, detail, and polish whether viewed on a phone, desktop, or large-screen monitor.
5. 2D Versus 3D: Moho’s Unique Position
A key advantage of Moho Animation is how it bridges the gap between 2D and 3D animation workflows. While Moho is fundamentally a 2D animation tool, its bone rigging system, Smart Bones, physics simulations, and interpolation features allow animators to create motion with depth, weight, and fluidity often associated with 3D projects. This means creators can achieve lifelike character movement and dynamic scene composition without the complexity of full 3D modeling and rendering.
For studios and independent animators alike, Moho provides the stylistic appeal of 2D animation combined with some of the efficiency and realism of 3D, offering the best of both worlds.
Conclusion
Moho Animation is more than just software; it’s a powerful creative toolkit for animators of all skill levels. From beginners experimenting with simple rigs to professionals producing complex 2D animations, Moho provides the features, flexibility, and workflow efficiency necessary to bring ideas to life. Its bone rigging system, vector-based tools, physics simulations, and advanced features like Smart Bones and morph targets make it a standout choice in the 2D animation landscape.
By mastering Moho Animation, artists can streamline their creative process, produce professional-quality animations, and explore new artistic possibilities. Whether you’re crafting engaging characters for a web series, experimenting with visual storytelling, or building an animated portfolio, Moho offers everything needed to turn imagination into motion. As animation continues to evolve in the digital age, Moho remains a key tool for the next generation of creators.
FAQ
Q1: What is Moho Animation best used for?
A1: Moho Animation is ideal for 2D character animation, explainer videos, web series, motion graphics, and educational animations. Its bone rigging system makes character movement smooth and efficient.
Q2: Do I need drawing experience to use Moho?
A2: While drawing skills are helpful, Moho’s vector tools, pre-made assets, and rigging system allow beginners to create polished animations without extensive traditional drawing experience.
Q3: Can Moho handle complex scenes?
A3: Yes. Moho supports multiple layers, particle effects, and physics simulations, making it suitable for both simple and complex animations.
Q4: What platforms support Moho?
A4: Moho is available for Windows and macOS. Projects can be exported in various video and image formats for online and broadcast use.Q5: How long does it take to learn Moho Animation?
A5: Beginners can start creating basic animations within a few hours of practice. Mastery of advanced features like Smart Bones, lip-sync, and physics may take several weeks to months depending on experience.


Related Posts


Stay Informed With the Latest & Most Important News
Previous Post
Next Post
Previous Post

Next Post


Advertisement